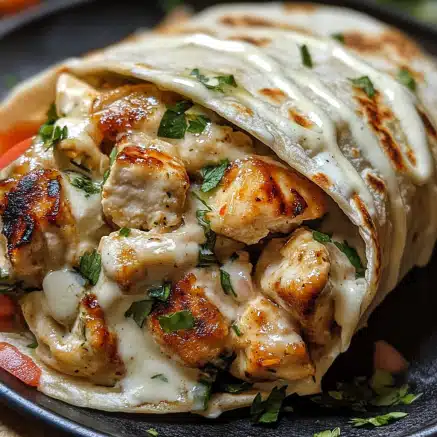

Baked Chicken Chimichangas are a delightful twist on traditional Mexican fare. This dish combines the joy of crispy chimichangas with the wholesome factors of baking rather than frying. Each bite offers a savory blend of shredded chicken, hearty spices, and melted cheese, all wrapped snugly in a golden tortilla. Perfect for a family dinner or as a delicious party dish, these baked chicken chimichangas promise to impress everyone at the table.
Imagine the warm aroma wafting through your kitchen as you prepare this mouthwatering meal. The satisfying crunch of the exterior combined with the tender, flavorful filling makes these chimichangas a favorite among both kids and adults alike. In this guide, we will explore what makes this recipe so appealing, how to prepare it, and tips for serving your gorgeous chimichangas that will leave your guests asking for seconds.
What truly makes Baked Chicken Chimichangas stand out is their combination of flavors, textures, and ease of preparation. You won’t need to be a culinary expert to whip up this delightful dish. With straightforward steps and readily available ingredients, you’ll create something that feels special without excessive effort. So grab your apron and let’s dive into this amazing recipe!
Why You’ll Love This Recipe
There are countless reasons why Baked Chicken Chimichangas will quickly become a favorite in your home. Here are just a few that highlight the fantastic qualities of this dish:
1. Healthier Option: Baking instead of frying cuts down on excess oil and makes for a healthier meal overall.
2. Flavorful Filling: The shredded chicken infused with spices and cheese creates an irresistible filling.
3. Easy to Customize: You can adapt the ingredients to suit your taste preferences or dietary restrictions effortlessly.
4. Perfect for Meal Prep: These chimichangas can be prepared in advance and reheated when you’re ready to eat.
5. Crowd-Pleaser: They are perfect for gatherings, parties, or family dinners; everyone loves a great chimichanga!
6. Quick Cooking: In under an hour, you can have a delicious and satisfying meal on your table.
With these magnificent factors in play, it’s easy to see why Baked Chicken Chimichangas capture the hearts and palates of so many!
Preparation and Cooking Time
In total, preparing Baked Chicken Chimichangas will take approximately 45 minutes. This includes the time needed for preparation and baking. Here’s a quick breakdown of the estimated time needed:
– Preparation Time: 15-20 minutes
– Cooking Time: 25 minutes
This simple timeframe makes these chimichangas an excellent choice for a weeknight meal or last-minute entertaining.
Ingredients
– 2 cups cooked shredded chicken
– 1 cup shredded cheese (cheddar or Monterey Jack)
– 1 cup black beans (drained and rinsed)
– 1/2 cup diced onion
– 1/2 cup salsa (your favorite type)
– 1 teaspoon ground cumin
– 1 teaspoon chili powder
– 1/2 teaspoon garlic powder
– Salt and pepper to taste
– 6 large flour tortillas
– Cooking spray or olive oil (for brushing)
– Fresh cilantro and lime wedges (for garnish, optional)
Step-by-Step Instructions
Creating Baked Chicken Chimichangas is a straightforward process if you follow these easy steps:
1. Preheat the Oven: Start by preheating your oven to 400°F (200°C). Lightly grease a baking sheet with cooking spray or olive oil.
2. Prepare Filling: In a large mixing bowl, combine the shredded chicken, cheese, black beans, diced onion, salsa, cumin, chili powder, garlic powder, salt, and pepper. Mix thoroughly until well combined.
3. Fill the Tortillas: Place a flour tortilla on a flat surface. Spoon about 1/2 cup of the chicken mixture onto the center of the tortilla.
4. Fold the Tortilla: Fold the sides of the tortilla over the filling, then roll it up from the bottom to the top, creating a tight roll. Repeat this process for the remaining tortillas and filling.
5. Place on Baking Sheet: Arrange the rolled chimichangas seam-side down on the prepared baking sheet.
6. Brush with Oil: Lightly brush the tops of the chimichangas with olive oil or spray with cooking spray. This will help them achieve a golden-brown color while baking.
7. Bake: Place the baking sheet in the preheated oven. Bake for 20-25 minutes, or until the chimichangas are crispy and golden.
8. Remove and Cool: Once baked, remove them from the oven and let them cool for a few minutes before serving.
9. Garnish (Optional): If desired, garnish with fresh cilantro and lime wedges for added flavor and presentation.
10. Serve: Place the baked chimichangas on a serving platter, ready for your guests to enjoy!
These steps will help you create amazing Baked Chicken Chimichangas like a pro!
How to Serve
To elevate your serving experience of Baked Chicken Chimichangas, consider the following tips:
1. Presentation: Arrange the chimichangas neatly on a large plate or serving dish. Adding a garnish of fresh cilantro can enhance the dish’s appearance.
2. Accompaniments: Serve with a side of guacamole, sour cream, and more salsa for dipping. This adds layers of flavor and makes the meal more interactive.
3. Side Dishes: Consider accompanying your chimichangas with a side of Mexican rice or a fresh salad to create a complete meal.
4. Beverage Pairing: Pair with refreshing drinks like iced tea, margaritas, or your favorite soda to complement the flavors.
5. Family Style: Encourage your guests to build their own chimichangas by offering additional toppings like diced tomatoes, jalapeños, or shredded lettuce.
By giving thought to how you serve Baked Chicken Chimichangas, you can create an unforgettable dining experience that your family and friends are sure to rave about!
Additional Tips
– Adjust Spice Levels: Modify the amount of cumin and chili powder based on your heat preference. For a milder version, reduce these spices. Conversely, feel free to add more for a spicy kick.
– Use Fresh Ingredients: Fresh herbs and high-quality salsa can significantly elevate the flavor of your chimichangas.
– Experiment with Cheese: While cheddar and Monterey Jack are favorites, consider trying pepper jack or a blend of cheeses for added richness.
– Crispier Texture: To ensure maximum crispiness, flip the chimichangas halfway through baking. This will help them brown evenly.
Recipe Variation
Get creative with your Baked Chicken Chimichangas! Here are a few variations to consider:
1. Green Chili Chicken Chimichangas: Incorporate canned green chilies into the filling for a zesty twist.
2. Veggie-Loaded Version: Replace half of the chicken with sautéed vegetables such as bell peppers, zucchini, or mushrooms for a vegetarian option.
3. Southwest-Style: Add corn, diced tomatoes, or black olives to the filling for a more robust flavor.
4. Breakfast Chimichangas: Substitute shredded chicken with scrambled eggs, breakfast sausage, and cheese for a delicious morning treat.
Freezing and Storage
– Storage: Keep any leftover chimichangas in an airtight container in the refrigerator for up to 3 days. Reheat in the oven for the best texture.
– Freezing: You can freeze uncooked chimichangas before baking. Wrap them tightly in foil or plastic wrap and store them in the freezer for up to 3 months. When ready to eat, bake them straight from the freezer; just add a few extra minutes to the cooking time.
Special Equipment
Here is some essential equipment you’ll need to successfully make Baked Chicken Chimichangas:
– Baking Sheet: A sturdy baking sheet to hold the chimichangas while they bake.
– Mixing Bowls: For combining your filling ingredients.
– Sharp Knife: Helps with chopping and dicing ingredients like onions and veggies.
– Cooking Spray: To grease the baking sheet and ensure easy release of the chimichangas.
Frequently Asked Questions
Can I use store-bought rotisserie chicken?
Yes, using rotisserie chicken is a convenient option and will save you time.
How can I make these chimichangas gluten-free?
Use gluten-free tortillas instead of regular flour tortillas to accommodate gluten sensitivities.
What is the best way to reheat leftovers?
Reheat in the oven at 350°F (175°C) until warmed through for the best texture.
Are these chimichangas suitable for freezing?
Yes, uncooked chimichangas can be frozen. Cooked chimichangas can also be reheated from frozen.
Can I make the filling ahead of time?
Absolutely! You can prepare the filling a day in advance and store it in the refrigerator until you’re ready to roll and bake the chimichangas.
Conclusion
Baked Chicken Chimichangas are an easy, delicious dish that can quickly become a staple in your kitchen. They offer a delightful mix of flavors and textures that appeal to everyone, making them perfect for any occasion. With the flexibility to customize, freeze, or adapt the recipe, you’ll find that this dish not only satisfies hunger but also brings joy to every meal. So next time you’re searching for a tasty dinner idea, look no further than these scrumptious baked chicken chimichangas!

Baked Chicken Chimichangas: An Incredible Ultimate Recipe for Everyone
- Total Time: 40 minutes
Ingredients
– 2 cups cooked shredded chicken
– 1 cup shredded cheese (cheddar or Monterey Jack)
– 1 cup black beans (drained and rinsed)
– 1/2 cup diced onion
– 1/2 cup salsa (your favorite type)
– 1 teaspoon ground cumin
– 1 teaspoon chili powder
– 1/2 teaspoon garlic powder
– Salt and pepper to taste
– 6 large flour tortillas
– Cooking spray or olive oil (for brushing)
– Fresh cilantro and lime wedges (for garnish, optional)
Instructions
Creating Baked Chicken Chimichangas is a straightforward process if you follow these easy steps:
1. Preheat the Oven: Start by preheating your oven to 400°F (200°C). Lightly grease a baking sheet with cooking spray or olive oil.
2. Prepare Filling: In a large mixing bowl, combine the shredded chicken, cheese, black beans, diced onion, salsa, cumin, chili powder, garlic powder, salt, and pepper. Mix thoroughly until well combined.
3. Fill the Tortillas: Place a flour tortilla on a flat surface. Spoon about 1/2 cup of the chicken mixture onto the center of the tortilla.
4. Fold the Tortilla: Fold the sides of the tortilla over the filling, then roll it up from the bottom to the top, creating a tight roll. Repeat this process for the remaining tortillas and filling.
5. Place on Baking Sheet: Arrange the rolled chimichangas seam-side down on the prepared baking sheet.
6. Brush with Oil: Lightly brush the tops of the chimichangas with olive oil or spray with cooking spray. This will help them achieve a golden-brown color while baking.
7. Bake: Place the baking sheet in the preheated oven. Bake for 20-25 minutes, or until the chimichangas are crispy and golden.
8. Remove and Cool: Once baked, remove them from the oven and let them cool for a few minutes before serving.
9. Garnish (Optional): If desired, garnish with fresh cilantro and lime wedges for added flavor and presentation.
10. Serve: Place the baked chimichangas on a serving platter, ready for your guests to enjoy!
These steps will help you create amazing Baked Chicken Chimichangas like a pro!
- Prep Time: 15 minutes
- Cook Time: 25 minutes
Nutrition
- Serving Size: 6
- Calories: 350 kcal
- Fat: 12g
- Protein: 25g