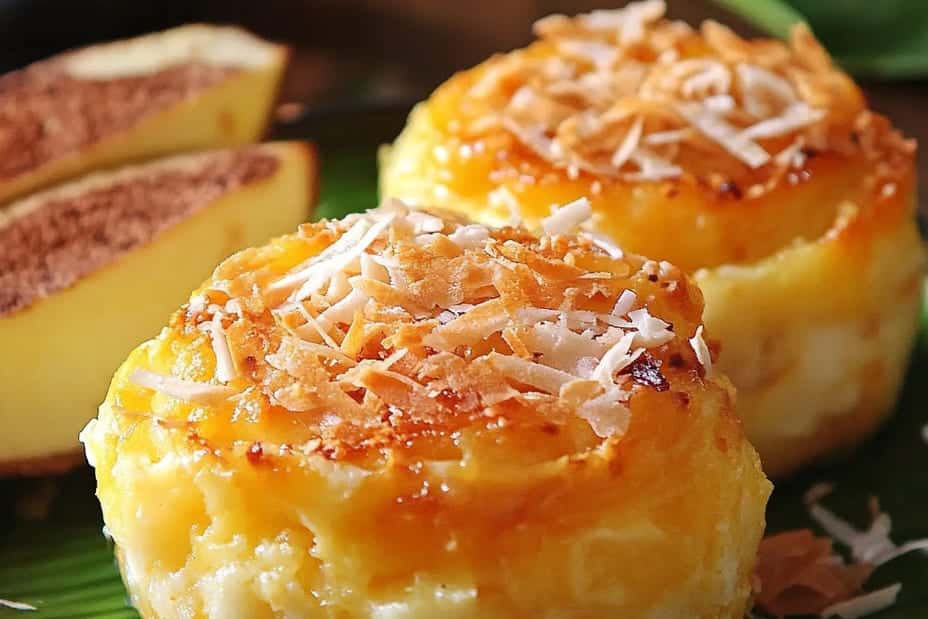
Bibingka is a delightful traditional Filipino coconut rice cake that offers an incredible blend of flavors and textures. This beloved treat is often associated with the Christmas season in the Philippines, where it brings families together to celebrate and indulge in its warm, comforting taste. With its soft, moist texture and rich coconut essence, bibingka is not just a dessert; it’s an experience filled with cultural significance and cherished memories.
Imagine taking a bite of bibingka, the warm sweetness mingling with the subtle saltiness from the cheese, creating a perfect balance. The natural aroma of coconut and the smoky hint from cooking it in a banana leaf transport you straight to the bustling streets of the Philippines. As we delve into the wonders of this dish, you’ll discover its preparation, cultural significance, and tips to enjoy it best.
The process of making bibingka is not only straightforward but also deeply rewarding. It’s an amazing recipe that has stood the test of time, cherished across generations. Whether you’re looking to impress guests at a holiday gathering or simply want to enjoy a slice with your morning coffee, this bibingka recipe aims to satisfy your cravings and warm your heart.
In this article, we will explore various aspects of bibingka, including why you’ll love this recipe, preparation and cooking time, a comprehensive list of ingredients, detailed step-by-step instructions, and how to serve this exquisite dish to make your experience even more memorable.
Why You’ll Love This Recipe
Bibingka is a remarkable traditional treat that brings so much joy and flavor. Here are several reasons why you should consider this recipe:
1. Cultural Heritage: Bibingka is steeped in Filipino culture and tradition, making it a meaningful dish to prepare during special occasions.
2. Unique Ingredients: The use of coconut and rice flour gives bibingka its distinctive taste and texture, setting it apart from other rice cakes.
3. Simple to Make: Even novice cooks will find this recipe easy to follow, making it accessible for everyone.
4. Versatile Toppings: You can customize your bibingka with various toppings, such as salted eggs, cheese, or even coconut flakes, to suit your taste.
5. Perfect for Sharing: Bibingka is typically served in family gatherings, promoting togetherness and communal enjoyment.
6. Delightful Flavor Combination: The blend of sweet and salty creates a balanced flavor that appeals to many palates.
Each of these aspects makes bibingka not just a recipe, but a dish filled with history and love. You’ll quickly discover that making bibingka is a rewarding endeavor filled with delightful results.
Preparation and Cooking Time
Creating bibingka requires some preparation but the result is well worth the effort. Here’s a breakdown of the time required:
– Preparation Time: 20 minutes
– Cooking Time: 30-35 minutes
– Total Time: Approximately 50-55 minutes
Being mindful of your pacing will help ensure the flavors meld beautifully as they bake.
Ingredients
– 2 cups rice flour
– 1 cup coconut milk
– 1 cup water
– 1 cup sugar
– 1 tablespoon baking powder
– 1/2 teaspoon salt
– 2 large eggs
– 1/2 cup grated coconut (optional)
– 1/2 cup sliced salted eggs (optional)
– 1/2 cup grated cheese (optional)
– Banana leaves for lining (or baking pan)
Step-by-Step Instructions
Making bibingka involves a series of easy-to-follow steps to ensure everything comes together perfectly. Here is how you do it:
1. Preheat the Oven: Preheat your oven to 375°F (190°C).
2. Prepare the Baking Dish: If using banana leaves, soften them over an open flame for about 10 seconds on each side to make them pliable. Line a round cake pan with the leaves.
3. Mix Dry Ingredients: In a large bowl, combine the rice flour, sugar, baking powder, and salt. Stir well to combine.
4. Combine Wet Ingredients: In another bowl, whisk together the coconut milk, water, and eggs until evenly mixed.
5. Combine Mixtures: Gradually add the wet mixture to the dry ingredients. Stir until smooth and well incorporated. If using grated coconut, fold it in now.
6. Pour Batter: Pour the batter into the prepared cake pan lined with banana leaves.
7. Add Toppings: If desired, arrange the sliced salted eggs and grated cheese on top of the batter.
8. Bake: Place the cake pan in the preheated oven and bake for about 30-35 minutes, or until a toothpick inserted in the center comes out clean.
9. Cool: Remove the bibingka from the oven and let it cool for about 10 minutes before serving. Remove from the pan and leaves if using.
10. Serve Warm: Cut into wedges and serve warm. Enjoy the delicious combination of flavors.
These straightforward steps will guide you toward creating delicious bibingka in your kitchen, enabling you to experience the rich traditions of Filipino culture.
How to Serve
Presenting bibingka beautifully enhances the overall dining experience. Here are some tips on how to serve this delicious treat:
1. Presentation on a Platter: Place the bibingka on a decorative platter, allowing the banana leaves to show for visual appeal.
2. Toppings: Top with extra grated cheese or coconut for an added touch. You can also sprinkle some sugar for sweetness.
3. Accompaniments: Consider serving bibingka with hot chocolate or coffee for a comforting experience. The warm drinks perfectly balance the cake’s sweetness.
4. Cut into Wedges: Serve in small wedges to make it easy for guests to enjoy and encourage them to take seconds.
5. Warm is Best: Bibingka is best enjoyed warm, so consider warming it slightly before serving, enhancing its softness and flavor.
By putting thought into how you serve bibingka, you elevate the dish beyond just a recipe; you create a memorable experience for everyone involved.
In conclusion, bibingka is more than just a delicious rice cake; it is a symbol of culture, tradition, and togetherness. It holds a special place in Filipino hearts and households, often enjoyed during festive seasons. Its combination of flavors and the warmth it brings is a reminder of home and family. With the guidance provided in this article, you too can explore the wonders of bibingka and bring a piece of the Philippines into your own kitchen, leaving everyone who tastes it with joyful memories.
Additional Tips
– Use Fresh Ingredients: Ensure that your ingredients, especially the coconut milk and eggs, are fresh for optimal flavor and texture.
– Experiment with Flavors: Consider adding vanilla extract or a hint of pandan essence to enhance the cake’s aroma and taste.
– Keep an Eye on the Baking Time: Since ovens vary, check your bibingka a few minutes before the suggested baking time to prevent overcooking.
Recipe Variation
If you’re looking to switch things up, here are some variations of bibingka to try:
1. Chocolate Bibingka: Add cocoa powder to the batter for a chocolatey twist, perfect for chocolate lovers.
2. Ube Bibingka: Incorporate ube (purple yam) into the batter for a vibrant color and unique flavor profile.
3. Vegan Option: Substitute eggs with flaxseed meal mixed with water and use coconut yogurt instead of dairy ingredients.
Freezing and Storage
– Storage: Store any leftover bibingka in an airtight container at room temperature for up to 2 days. Refrigerate if you prefer it chilled.
– Freezing: To freeze, wrap slices of bibingka tightly in plastic wrap and place them in a freezer-safe bag. It can last up to 3 months in the freezer.
Special Equipment
To create the perfect bibingka, you will need the following items:
– Mixing bowls for combining ingredients.
– A whisk or electric mixer for beating eggs and wet ingredients.
– A round cake pan, preferably lined with banana leaves or greased with oil.
– A spatula for smoothing the batter.
– An oven for baking.
Frequently Asked Questions
What is the best way to serve bibingka?
Bibingka is best served warm, either plain or topped with salted eggs and cheese. Pair it with hot chocolate or coffee for a delightful experience.
Can I make bibingka ahead of time?
Yes, you can prepare bibingka a few hours before serving. Just ensure to reheat it slightly to enjoy its softness.
Is there a gluten-free version of bibingka?
Absolutely! You can use a gluten-free rice flour mix for a gluten-free version of bibingka.
Can I use a different type of milk?
While coconut milk gives bibingka its unique flavor, you can experiment with almond or oat milk for a different twist.
Conclusion
Bibingka: Traditional Filipino Coconut Rice Cake is a cherished recipe that resonates with cultural significance and delightful flavors. Making bibingka offers a unique blend of cooking tradition and modern convenience, making it ideal for celebrations or simple family gatherings. Its soft, moist texture combined with its rich coconut flavor will not only satisfy your taste buds but also bring a taste of the Philippines into your home. As you explore this dish, you’ll create lasting memories with friends and family, enjoying the experience that goes beyond a mere recipe.

Bibingka: An Amazing Ultimate Traditional Filipino Coconut Rice Cake Recipe
- Total Time: 0 hours
Ingredients
– 2 cups rice flour
– 1 cup coconut milk
– 1 cup water
– 1 cup sugar
– 1 tablespoon baking powder
– 1/2 teaspoon salt
– 2 large eggs
– 1/2 cup grated coconut (optional)
– 1/2 cup sliced salted eggs (optional)
– 1/2 cup grated cheese (optional)
– Banana leaves for lining (or baking pan)
Instructions
Making bibingka involves a series of easy-to-follow steps to ensure everything comes together perfectly. Here is how you do it:
1. Preheat the Oven: Preheat your oven to 375°F (190°C).
2. Prepare the Baking Dish: If using banana leaves, soften them over an open flame for about 10 seconds on each side to make them pliable. Line a round cake pan with the leaves.
3. Mix Dry Ingredients: In a large bowl, combine the rice flour, sugar, baking powder, and salt. Stir well to combine.
4. Combine Wet Ingredients: In another bowl, whisk together the coconut milk, water, and eggs until evenly mixed.
5. Combine Mixtures: Gradually add the wet mixture to the dry ingredients. Stir until smooth and well incorporated. If using grated coconut, fold it in now.
6. Pour Batter: Pour the batter into the prepared cake pan lined with banana leaves.
7. Add Toppings: If desired, arrange the sliced salted eggs and grated cheese on top of the batter.
8. Bake: Place the cake pan in the preheated oven and bake for about 30-35 minutes, or until a toothpick inserted in the center comes out clean.
9. Cool: Remove the bibingka from the oven and let it cool for about 10 minutes before serving. Remove from the pan and leaves if using.
10. Serve Warm: Cut into wedges and serve warm. Enjoy the delicious combination of flavors.
These straightforward steps will guide you toward creating delicious bibingka in your kitchen, enabling you to experience the rich traditions of Filipino culture.
- Prep Time: 15 minutes
- Cook Time: 30-35 minutes
Nutrition
- Serving Size: 8-10 servings
- Calories: 200 kcal (per serving)
- Fat: 5g
- Protein: 3g