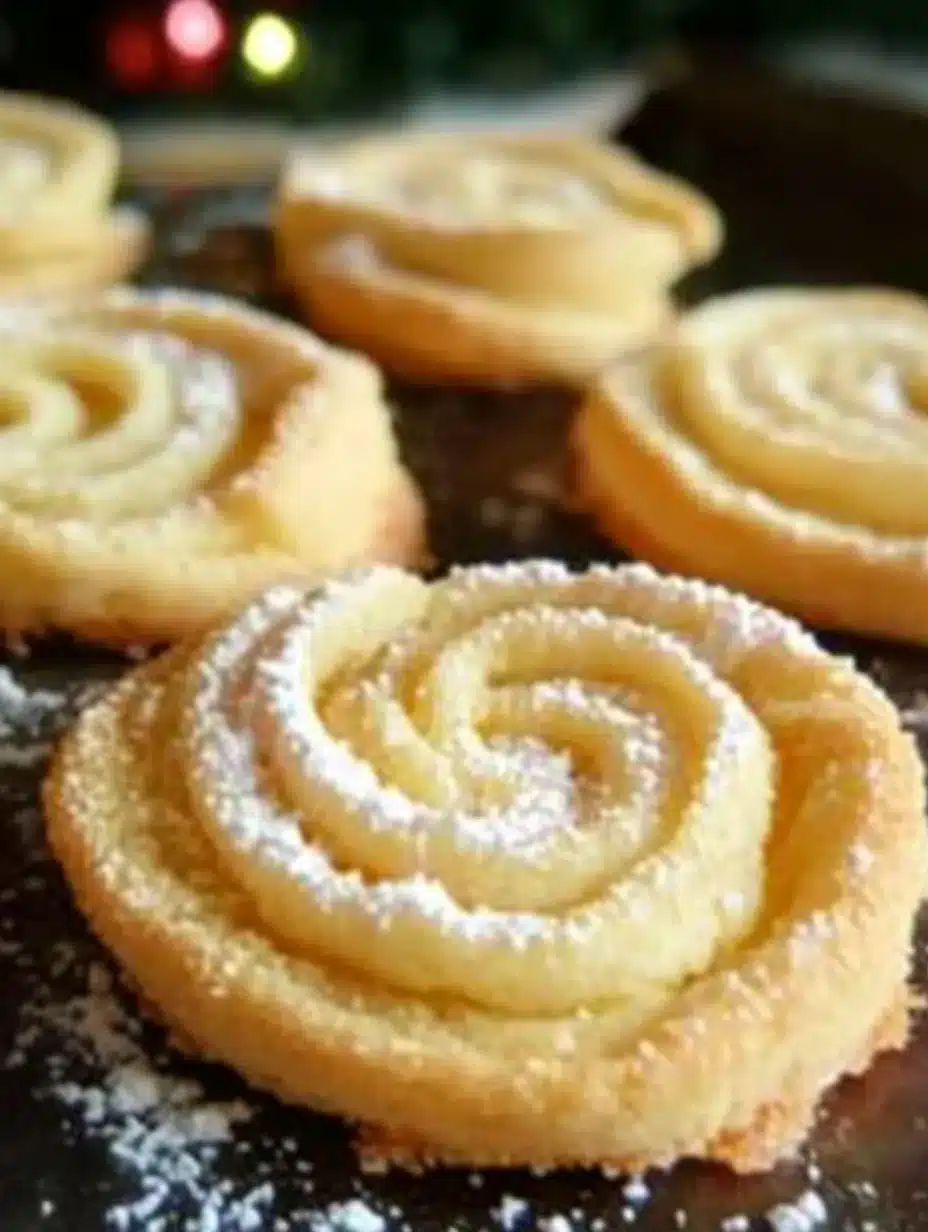
Christmas Cookies are a delightful treat that evokes the spirit and joy of the holiday season. These festive baked goodies not only satisfy your sweet tooth but also bring warmth and comfort during the chilly winter months. Whether you enjoy baking them yourself or sharing them with loved ones, Christmas cookies hold a special place in holiday traditions around the world. The aroma of freshly baked cookies wafting through the house brings an amazing sense of nostalgia and cheer, turning any gathering into a celebration filled with laughter and love.
Imagine a table adorned with colorful spritz cookies, chewy gingerbread men, and delicate sugar cookies, all decorated in festive designs. Each bite transports you back to fond memories of family gatherings, secret Santa exchanges, and cozy evenings by the fireplace. This amazing collection of recipes ensures there’s something for everyone, whether you prefer traditional flavors or new, innovative ideas.
In this article, you’ll discover why these Christmas Cookies are a treasured addition to your holiday repertoire. We’ll delve into the preparation and cooking times, provide you with a straightforward list of ingredients, and guide you through step-by-step instructions to make your holiday baking a breeze. Ready to spread some cheer? Let’s dive into the wonderful world of Christmas Cookies!
Why You’ll Love This Recipe
The magic of Christmas Cookies lies not only in their taste but also in the memories they create. Here’s why you’ll absolutely fall in love with this recipe:
1. Versatile Flavors – From classic sugar cookies to spicy gingerbread, there’s a cookie for every taste preference.
2. Fun for Everyone – Baking Christmas cookies provides a chance to bond with family and friends, making it a fun activity to enjoy together.
3. Easy to Customize – You can easily adapt the recipes with various toppings, fillings, and decorations to make them uniquely yours.
4. Perfect Holiday Gift – Beautifully packaged, cookies make wonderful gifts for teachers, neighbors, and friends during the holiday season.
5. Beautiful Presentation – Festively decorated cookies bring color and cheer to any holiday spread, enhancing the festive atmosphere.
6. Create Lasting Memories – Making cookies together as a family creates special moments and treasured memories that last a lifetime.
By embracing this amazing Christmas Cookies recipe, you’re not just baking; you’re weaving joy into the fabric of the holidays!
Preparation and Cooking Time
Making Christmas Cookies does take some time, but the reward is well worth it. Here’s a quick overview of the timeline involved:
– Preparation Time: 30 minutes
– Cooking Time: 10-12 minutes per batch
– Cooling Time: 15-20 minutes
Depending on the number of cookie varieties you decide to make, you may need to adjust your timing. This framework will guide you through an efficient and joyful baking experience.
Ingredients
– 3 cups all-purpose flour
– 1 cup unsalted butter, softened
– 1 ½ cups granulated sugar
– 2 large eggs
– 1 tablespoon vanilla extract
– 1 teaspoon baking powder
– ¼ teaspoon salt
– ½ teaspoon ground cinnamon (optional)
– ½ teaspoon ground nutmeg (optional)
– 1 cup powdered sugar (for frosting, optional)
– Food coloring (for decorating, optional)
– Sprinkles, candies, or chocolate chips (for toppings, optional)
Step-by-Step Instructions
Creating delicious Christmas Cookies can be fun and straightforward if you follow these easy steps:
1. Preheat Your Oven: Preheat your oven to 350°F (175°C). Line your baking sheets with parchment paper for easy cookie transfer.
2. Mix Butter and Sugar: In a large mixing bowl, cream together the softened butter and granulated sugar until light and fluffy.
3. Add Eggs and Vanilla: Incorporate the eggs one at a time, mixing well after each addition. Then, add the vanilla extract.
4. Combine Dry Ingredients: In a separate bowl, whisk together the flour, baking powder, salt, and spices.
5. Combine Mixtures: Gradually add the dry ingredients to the butter mixture, stirring until well blended and a dough forms.
6. Roll the Dough: On a floured surface, roll out the dough to your desired thickness. About ¼ inch thick is ideal for most cookie types.
7. Cut Shapes: Use cookie cutters to create festive shapes. Place cookies on the prepared baking sheets, leaving space for spreading.
8. Bake: Place in the preheated oven and bake for 10-12 minutes or until the edges are lightly golden.
9. Cool the Cookies: Remove them from the oven and let them cool on the baking sheets for 5 minutes before transferring to wire racks to cool completely.
10. Decorate (Optional): Once cooled, you can frost them using powdered sugar mixed with a little water or milk. Add food coloring for fun designs and top with sprinkles.
These steps will guide you in creating a delightful assortment of Christmas Cookies effortlessly.
How to Serve
Serving your Christmas Cookies is all about presentation and enjoyment. Here are some tips to elevate your cookie serving experience:
1. Creative Platters: Arrange the cookies on decorative platters or cookie tins for a beautiful display. Use festive colors that reflect the season.
2. Accompaniments: Pair with hot cocoa, coffee, or eggnog to enhance the holiday experience. A cozy beverage complements the sweetness of cookies perfectly.
3. Variety: Offer an array of cookie types to cater to different preferences. A mix of flavors, shapes, and festive decorations adds excitement.
4. Gift-Giving: Package some cookies in festive gift boxes or bags to share with friends and family. A sweet gesture that conveys your holiday spirit.
5. Fun Activities: Set up a cookie decorating station where family and friends can personalize their cookies with icing and toppings.
By focusing on presentation and enjoyment, you can make serving your Christmas Cookies a delightful experience for everyone involved. Happy Baking!
Additional Tips
– Use Fresh Ingredients: Always opt for fresh ingredients, particularly baking powder and spices, to ensure optimal flavor in your Christmas Cookies.
– Chill the Dough: If the dough becomes too soft, chill it in the refrigerator for 30 minutes to make it easier to work with and prevent spreading.
– Experiment with Flavor: Try adding different extracts such as almond or peppermint for a unique taste.
– Bake in Batches: Baking in smaller batches allows for better control over the baking time, ensuring all cookies are evenly baked.
Recipe Variation
Explore different variations to make your Christmas Cookies even more exciting:
1. Chocolate Chip Christmas Cookies: Fold in chocolate chips for a gooey and sweet twist to the traditional recipe.
2. Nuts and Dried Fruits: Add chopped nuts like walnuts or pecans, or mix in dried fruits like cranberries or raisins for a chewy texture.
3. Unique Icing: Try using cream cheese frosting instead of traditional icing for a rich flavor.
4. Spiced Cookies: Include ingredients like cloves and allspice for deeper, warm notes in your festive cookies.
Freezing and Storage
– Storage: Keep your cookies in an airtight container at room temperature for up to a week to maintain their freshness.
– Freezing: Christmas Cookies freeze beautifully. Place them in a single layer on a baking sheet, freeze until solid, and then transfer to a freezer-safe bag. They can be frozen for up to three months.
– Thawing: When ready to enjoy, thaw cookies at room temperature for a few hours before serving.
Special Equipment
Here are some essential tools that will make the baking process smoother:
– Mixing bowls: For combining your ingredients.
– Measuring cups and spoons: Accurate measurements ensure the perfect cookie texture.
– Rolling pin: Essential for rolling out the dough to your desired thickness.
– Cookie cutters: Choose festive shapes to bring holiday cheer to your cookies.
– Baking sheets: Use multiple sheets to bake more cookies at once.
– Parchment paper: Lining sheets with parchment makes for easy removal of cookies.
Frequently Asked Questions
What types of cookies can I make with this basic recipe?
You can create various cookies such as sugar cookies, gingerbread cookies, or snickerdoodles using this recipe as a base.
How should I store decorated cookies?
Keep decorated cookies in a single layer in an airtight container. To prevent icing smudging, you may want to separate layers with parchment paper.
Can I substitute the butter?
Yes! You can use margarine or coconut oil as a substitute for butter if desired, keeping in mind that the flavor and texture might vary slightly.
What if my dough is too sticky?
If your dough feels too sticky, add a little extra flour until you achieve a manageable consistency.
Can I use gluten-free flour?
Absolutely! You can substitute all-purpose flour with a gluten-free blend that is suitable for baking.
Conclusion
Christmas Cookies are more than just a sweet treat; they are a timeless tradition that brings joy to gatherings and celebrations. With a variety of flavors and creative expressions available through different decorations, these cookies truly embody the spirit of the holidays. By trying out new recipes and variations, you can delight your family and friends with festive creations that become part of cherished memories. So gather your loved ones, decorate, and enjoy the celebration of Christmas Cookies together!
Christmas Cookies: An Incredible Ultimate Recipe for the Holidays
- Total Time: 0 hours
Ingredients
– 3 cups all-purpose flour
– 1 cup unsalted butter, softened
– 1 ½ cups granulated sugar
– 2 large eggs
– 1 tablespoon vanilla extract
– 1 teaspoon baking powder
– ¼ teaspoon salt
– ½ teaspoon ground cinnamon (optional)
– ½ teaspoon ground nutmeg (optional)
– 1 cup powdered sugar (for frosting, optional)
– Food coloring (for decorating, optional)
– Sprinkles, candies, or chocolate chips (for toppings, optional)
Instructions
Creating delicious Christmas Cookies can be fun and straightforward if you follow these easy steps:
1. Preheat Your Oven: Preheat your oven to 350°F (175°C). Line your baking sheets with parchment paper for easy cookie transfer.
2. Mix Butter and Sugar: In a large mixing bowl, cream together the softened butter and granulated sugar until light and fluffy.
3. Add Eggs and Vanilla: Incorporate the eggs one at a time, mixing well after each addition. Then, add the vanilla extract.
4. Combine Dry Ingredients: In a separate bowl, whisk together the flour, baking powder, salt, and spices.
5. Combine Mixtures: Gradually add the dry ingredients to the butter mixture, stirring until well blended and a dough forms.
6. Roll the Dough: On a floured surface, roll out the dough to your desired thickness. About ¼ inch thick is ideal for most cookie types.
7. Cut Shapes: Use cookie cutters to create festive shapes. Place cookies on the prepared baking sheets, leaving space for spreading.
8. Bake: Place in the preheated oven and bake for 10-12 minutes or until the edges are lightly golden.
9. Cool the Cookies: Remove them from the oven and let them cool on the baking sheets for 5 minutes before transferring to wire racks to cool completely.
10. Decorate (Optional): Once cooled, you can frost them using powdered sugar mixed with a little water or milk. Add food coloring for fun designs and top with sprinkles.
These steps will guide you in creating a delightful assortment of Christmas Cookies effortlessly.
- Prep Time: 30 minutes
- Cook Time: 10-12 minutes per batch
Nutrition
- Serving Size: 24 cookies
- Calories: 120 kcal per cookie
- Fat: 6g
- Protein: 1g