Filipino-Style Chicken Lumpia: Crispy, Savory Spring Rolls for Lunch is a culinary delight that brings comfort and joy in every bite. Originating from the Philippines, lumpia is not just a dish; it’s a cultural staple that has graced countless tables during family gatherings, festivals, and celebrations. These crispy spring rolls encapsulate a perfect blend of savory flavors wrapped in a delicate, crunchy shell that is simply irresistible.
If you’ve never tasted these amazing Filipino-Style Chicken Lumpia before, you’re in for a real treat. The moment you take a bite, the satisfying crunch gives way to a delightful explosion of flavors from the seasoned chicken filling. Perfectly assorted with a variety of spices and veggies, each spring roll is a testament to the rich Filipino culinary tradition. Whether you’re looking for a tasty lunch, a delightful snack, or an impressive appetizer for your next gathering, this lumpia recipe will not disappoint.
This article will guide you through everything you need to know to make the ultimate Filipino-Style Chicken Lumpia. You will discover why this recipe is beloved, how to prepare it efficiently, and the best ways to serve it for maximum enjoyment.
Why You’ll Love This Recipe
The Filipino-Style Chicken Lumpia stands out not only in taste but also in its versatility and ease of preparation. Here are several reasons why this dish will become a favorite in your kitchen:
1. Flavor Packed: Each lumpia is filled with a savory blend of chicken and vegetables, seasoned to perfection.
2. Crispy Texture: The thin wrapper turns perfectly golden and crispy, making for a fun eating experience.
3. Simple Ingredients: Most of the ingredients are pantry staples, making it easy to whip up anytime.
4. Customizable: You can add or substitute vegetables and proteins based on your personal preferences.
5. Great for Any Occasion: Serve them as appetizers at parties, lunch, or even as a snack for movie nights.
6. Crowd-Pleaser: Whether you’re serving friends or family, these spring rolls are sure to delight everyone.
The appeal of this lumpia recipe is undeniable. Each bite not only fills your stomach but also warms your heart, reminding you of family gatherings and joyous celebrations.
Preparation and Cooking Time
Creating your own Filipino-Style Chicken Lumpia is easier than you might think! Here’s a breakdown of the time commitment:
– Preparation Time: 30 minutes
– Cooking Time: 15–20 minutes
– Total Time: Approximately 50 minutes
This timeframe can vary based on your experience in the kitchen, but even novice cooks will find this recipe manageable!
Ingredients
– 1 pound ground chicken
– 1 cup finely chopped carrots
– 1 cup chopped green beans
– 1 medium onion, finely chopped
– 4 cloves garlic, minced
– 2 tablespoons soy sauce
– 1 teaspoon salt
– 1/2 teaspoon black pepper
– 1/4 teaspoon ground ginger
– 2 tablespoons vegetable oil (for cooking the filling)
– 20 spring roll wrappers
– 1 egg, beaten (for sealing the wrappers)
– Oil for frying
Step-by-Step Instructions
Creating Filipino-Style Chicken Lumpia can be straightforward if you follow these steps carefully:
1. Prepare the Filling: In a large pan, heat 2 tablespoons of vegetable oil over medium heat.
2. Sauté the Aromatics: Add the chopped onion and minced garlic to the pan and sauté until fragrant.
3. Cook the Chicken: Incorporate the ground chicken into the pan, stirring occasionally until cooked through.
4. Add Vegetables: Mix in the chopped carrots and green beans. Cook for an additional 5–7 minutes until the veggies are tender.
5. Season the Filling: Add soy sauce, salt, black pepper, and ground ginger. Stir well to combine. Remove from heat and let the filling cool.
6. Wrap the Lumpia: Take a spring roll wrapper and place it on a flat surface. Add approximately 2 tablespoons of the chicken filling near one edge.
7. Roll It Up: Fold the sides over the filling, then roll tightly from the filled edge to seal it. Use a little beaten egg to seal the edge.
8. Heat the Oil: In a large frying pan, heat enough oil over medium-high heat for deep frying.
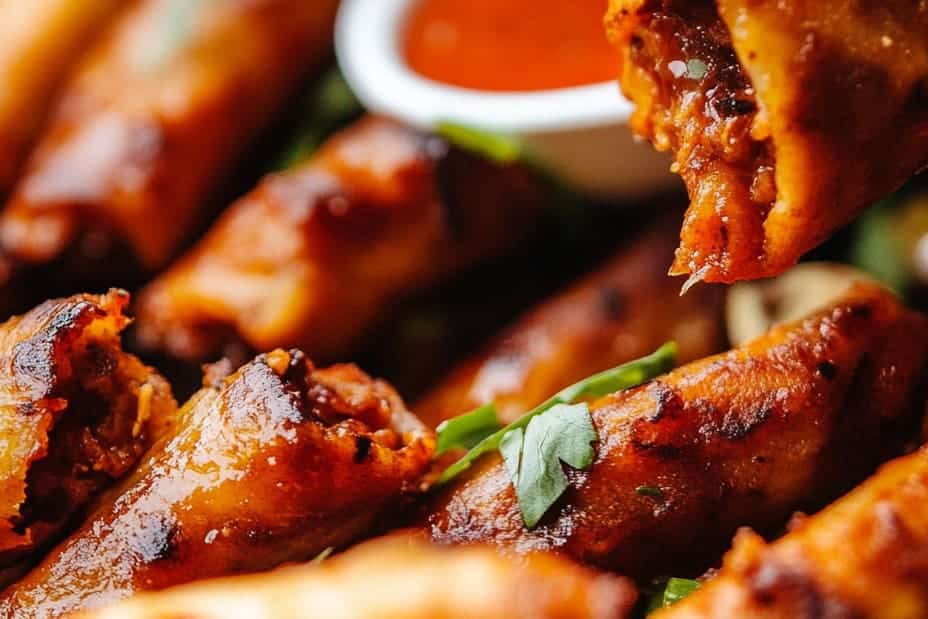
9. Fry the Lumpia: Once the oil is hot, carefully place a few lumpia in the oil. Fry until golden brown and crispy, about 3-5 minutes. Flip to cook evenly.
10. Drain Excess Oil: Remove the lumpia from the oil and drain on paper towels to absorb excess oil.
These steps will guide you in creating incredibly crispy and delectable lumpia at home!
How to Serve
To make your Filipino-Style Chicken Lumpia shine, consider the following serving suggestions:
1. Dipping Sauces: Serve them with sweet chili sauce, soy sauce, or vinegar for that perfect flavor balance.
2. Garnish: Fresh herbs like cilantro or green onions can elevate the dish visually and flavor-wise when sprinkled on top.
3. Plate Presentation: Use a nice platter to display your lumpia. Arrange them neatly for an appetizing presentation.
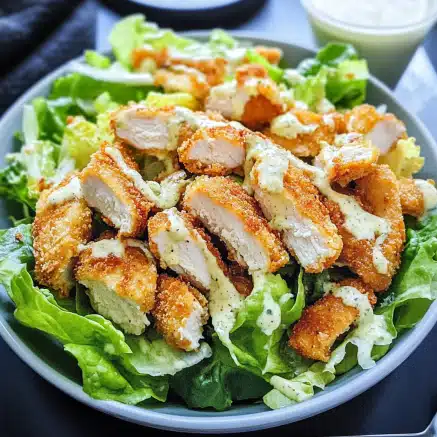
4. Pairings: Enjoy with a side of garlic fried rice or a refreshing salad for a full meal experience.
By emphasizing presentation and thoughtfully chosen side dishes, you can create a delightful dining experience that complements the amazing flavors of your Filipino-Style Chicken Lumpia.
In conclusion, making and enjoying these crispy, savory spring rolls is not just about the food; it’s about creating connections and memories with each bite. So gather your ingredients, roll up your sleeves, and immerse yourself in the joyful cooking experience that Filipino-Style Chicken Lumpia offers. Enjoy!
Additional Tips
– Use Fresh Ingredients: Always opt for fresh vegetables and high-quality chicken. This will enhance the flavor of your lumpia significantly.
– Pre-Make Filling: You can prepare the filling a day in advance and store it in the fridge. This saves time on busy days.
– Test the Oil Temperature: Before frying all your lumpia, test a small piece to ensure the oil is at the right temperature. It should bubble and sizzle immediately.
– Experiment with Dipping Sauces: Try different dipping sauces like sweet chili, garlic vinegar, or spicy soy sauce to discover your favorite combination.
Recipe Variation
There’s always room to get creative in the kitchen! Here are some fun variations to consider:
1. Vegetarian Lumpia: Substitute the chicken with minced tofu or additional vegetables like bell peppers or mushrooms.
2. Spicy Chicken Lumpia: Add chopped chili peppers to the filling for an extra kick.
3. Cheese-Stuffed Lumpia: Include a small piece of cheese in the filling for a gooey surprise inside your spring rolls.
4. Baked Lumpia: For a healthier option, brush the lumpia with oil and bake them in the oven at 425°F (220°C) for 20-25 minutes until crispy.
Freezing and Storage
– Storage: Maintain the freshness of your lumpia by storing them in an airtight container in the fridge, where they’ll last for 3-4 days.
– Freezing: To freeze, place uncooked lumpia in a single layer on a baking sheet. Once frozen, transfer them to a freezer bag. They can be stored for up to 3 months. Cook from frozen without thawing—just fry them for a few extra minutes.
Special Equipment
To make the preparation of Filipino-Style Chicken Lumpia easier, consider using the following tools:
– Frying Pan or Wok: An essential for frying the lumpia evenly.
– Mixing Bowls: Use these to combine ingredients conveniently.
– Tongs or Slotted Spoon: For safely flipping and removing the lumpia from hot oil.
– Food Processor: Optional, but helpful in finely chopping vegetables quickly.
Frequently Asked Questions
How do I know when the lumpia are done frying?
Golden brown and crispy: Lumpia are done when they achieve a golden brown color and feel crispy to the touch.
Can I prepare the filling in advance?
Yes, you can prepare the chicken filling ahead and refrigerate it for up to 2 days before wrapping the lumpia.
How do I keep the lumpia crispy?
Serve immediately after frying. If you need to make them ahead, keep them in a warm oven until serving, but this may soften their crispiness slightly.
Can I fry lumpia in an air fryer?
Absolutely! Arrange them in a single layer in the air fryer basket, spray with some oil, and air fry at 400°F (200°C) for about 10-12 minutes, flipping halfway through.
Do I need to thaw frozen lumpia before frying?
No, you can fry them straight from the freezer! Just add a few extra minutes to the frying time.
Conclusion
Filipino-Style Chicken Lumpia: Crispy, Savory Spring Rolls for Lunch is not just a delicious dish; it’s an experience that brings family and friends together. With its versatile ingredients, easy preparation, and inviting flavors, these spring rolls can be enjoyed on any occasion. Whether served as an appetizer or a main dish, each lumpia offers a delightful crunch and savory goodness that is hard to resist. So, gather your ingredients, follow this guide, and enjoy creating and sharing this much-loved Filipino dish!

Filipino-Style Chicken Lumpia: An Amazing Ultimate Recipe
- Total Time: 0 hours
Ingredients
– 1 pound ground chicken
– 1 cup finely chopped carrots
– 1 cup chopped green beans
– 1 medium onion, finely chopped
– 4 cloves garlic, minced
– 2 tablespoons soy sauce
– 1 teaspoon salt
– 1/2 teaspoon black pepper
– 1/4 teaspoon ground ginger
– 2 tablespoons vegetable oil (for cooking the filling)
– 20 spring roll wrappers
– 1 egg, beaten (for sealing the wrappers)
– Oil for frying
Instructions
Creating Filipino-Style Chicken Lumpia can be straightforward if you follow these steps carefully:
1. Prepare the Filling: In a large pan, heat 2 tablespoons of vegetable oil over medium heat.
2. Sauté the Aromatics: Add the chopped onion and minced garlic to the pan and sauté until fragrant.
3. Cook the Chicken: Incorporate the ground chicken into the pan, stirring occasionally until cooked through.
4. Add Vegetables: Mix in the chopped carrots and green beans. Cook for an additional 5–7 minutes until the veggies are tender.
5. Season the Filling: Add soy sauce, salt, black pepper, and ground ginger. Stir well to combine. Remove from heat and let the filling cool.
6. Wrap the Lumpia: Take a spring roll wrapper and place it on a flat surface. Add approximately 2 tablespoons of the chicken filling near one edge.
7. Roll It Up: Fold the sides over the filling, then roll tightly from the filled edge to seal it. Use a little beaten egg to seal the edge.
8. Heat the Oil: In a large frying pan, heat enough oil over medium-high heat for deep frying.
9. Fry the Lumpia: Once the oil is hot, carefully place a few lumpia in the oil. Fry until golden brown and crispy, about 3-5 minutes. Flip to cook evenly.
10. Drain Excess Oil: Remove the lumpia from the oil and drain on paper towels to absorb excess oil.
These steps will guide you in creating incredibly crispy and delectable lumpia at home!
- Prep Time: 15 minutes
- Cook Time: 15–20 minutes
Nutrition
- Serving Size: 5-6 lumpia
- Calories: 250 kcal (approximately per serving)
- Fat: 10g
- Protein: 15g